
Little lad socks: How I made article 12

This article is brought to you by Lizzsews.


In today's article, I will guide you through how I made a pair of little lad socks. Follow along with this project and share your result in Lizzsews Facebook group.


Recommended read: How I made article series


Remember that with infusible ink, you want to use white or light-coloured surfaces. I might’ve learned this the hard way… you also need to make sure that your surface is 100% polyester or a polyester-spandex mix. 


What I used: 

  - White crew socks (98% polyester, 2% spandex)

  - Purple infusible ink transfer sheets

  - Cricut 

  - Easypress 2 + mat

  - Lightgrip mat

  - Cardstock

  - Parchment paper or butcher paper


How I made it:


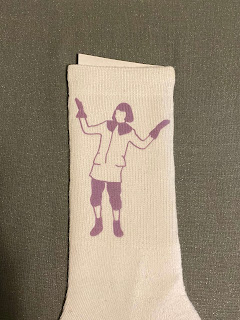
I started out by creating my design. I wanted to make a ‘little lad’ design. I took a picture of a little lad sticker I had seen online and loaded it into my iPad. Using procreate, I drew around the edges of the design and any other places I wanted to outline. 


Recommended read: What is procreate


I didn’t want the design to be too thin, so I duplicated the outline, offset it a little from the original, and cleaned it up. I wanted to add some 'character' to the design, so I filled in the hair, collar, gloves, pants and boots. 


I was happy with the design and exported it to my phone. Using Convertio, I converted the transparent png into an svg. 


Recommended read: What is an SVG


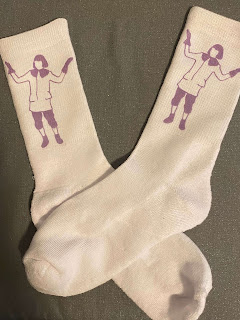
I imported the svg to Cricut design space and measured the sock, I wanted the design to go near the top of the sock and be on the side of the leg. I made the design 2.5” wide by 3.5” long. 


I cut the infusible ink transfer sheet with my Cricut and made sure to mirror the design. 


Recommended read: When and how to mirror


Infusible ink feels like cardstock or thick paper. To remove the excess material and weed the design, you bend/roll the transfer sheet until the material cracks away.


I prepped the sock by cutting a piece of cardstock to fit just inside it flat and lint rolled. I preheated my Easypress 2 to 385°F and pressed the sock for 5 seconds. I placed the transfer sheet down, ink side facing down. I placed the parchment paper on top and pressed it lightly for 60 seconds. 


You can use butcher paper to replace the parchment paper, I thought that I just didn't have it so I substituted it for parchment paper, but turns out that a sheet of butcher paper actually comes inside your roll of infusible ink when you order it from Cricut!


I peeled the liner up while it was warm. The design was done, and my sock was complete! I did the same for the other sock but faced the foot the other way and my pair of socks were complete. 


Leave a comment below and let me know if you made this birthday card! Don't forget to subscribe to get notified for my next blog post :)

Comments

Popular posts from this blog

10 Things You Need To Start Machine Embroidery Today

 This article is brought to you by  Lizzsews . How to start machine embroidery! Here’s everything that you need to get started with machine embroidery! Without spending too much! Are you interested in sewing? Recommended read:  10 things you'll need to start sewing! 1. You are going to need an embroidery machine . You can use any embroidery machine you want. Here are a couple of examples: The Brother se600. This machine can do both sewing and embroidery, and is the best budget embroidery machine! I highly suggest this machine. The brother pe550D! This is an embroidery-only machine, with awesome Disney embroidery designs! The brother se1900. I recommend the Brother brand for sewing and embroidery machines. To note here: determine your budget, determine how much you have to spend on embroidery supplies (and blanks ) and how much you have to spend on your machine. Purchase the largest embroidery hoop that you can afford! The se600 is an amazing machine and I highly recomm

8 Reasons Why Your Upper Thread Is Shredding On Your Embroidery Machine

 This article is brought to you by  Lizzsews . Here are some reasons why your top thread might be shredding while you’re embroidering! Starting machine embroidery is definitely a challenge, and troubleshooting is hard.  Recommended read: 10 Things you need to start machine embroidery today Often when your top thread is shredding, it’s caused by when the thread goes through the eye of the needle or while it’s going through the thread guides.  1. A dull or bent needle How long has it been since you’ve changed that needle? It might be time to swap it out! A needle only lasts about 8-10 hours of stitching, this amount of time may vary depending on what you are making. It’s good to have lots of needles on hand. Recommended read: When should I change the needle for machine embroidery 2. Are you using the right needle for the project? Are you embroidering heavier fabrics? Like denim or leather? If so, you’ll want to use a heavier needle size like 90/14. If you’re just embroidering mid-weight

Guide To The Three Main Machine Embroidery Stabilizers

 This article is brought to you by  Lizzsews . Here is everything that you need to know about the three main machine embroidery stabilizers. Stabilizers are important in machine embroidery; they prevent puckering and support the fabric.  The stabilizer goes underneath the fabric you are embroidering. Although there are some stabilizers that will go on top of certain types of fabric, this is called a topper.  A bottom stabilizer is always needed, you can never embroider without stabilizer, but a stabilizer topper is only needed for certain blanks. The three main types of stabilizers are cutaway, tearaway, and wash away.  The first is a cutaway stabilizer. A cutaway stabilizer can be used on clothes and many different types of fabric. The cutaway stabilizer is permanent and is mainly designed for knit fabric. It is non-woven and helps get rid of pulled or sagging stitches.  The cutaway stabilizer has a lot of stretch resistance and stays intact after wearing, using, and launderin