
How to make branding labels/tags

 This article is brought to you by Lizzsews.


For my other shop, Howes It Sewing, I was looking into how to create branding labels. I did not know how to create tags and I was surprised to see that there were no tutorials on how to make the type of labels I was interested in. 


So, I will guide you through how to make branding labels to add to your handmade products to add a more professional look.


Recommended read: Selling handmade products online


To learn how to make these, with the look that I was going for, took quite a bit of trial and error. But, I’m happy to say that in the end, I was able to make some awesome-looking, and professional, tags! I have made these tags numerous times now and I add them to anything that I make that can have a sew-in tag.


And now that I have learned how to make these, I’m going to share what I learned with all of you!


What I used:


How to make:

   1. Prepare your 'logo' design into an SVG.


Remember to make it simple, the cut is going to be very small, you're most likely going to be making a lot of these, and you don't want to drown yourself by weeding them for hours.


Recommended read: What is an SVG


   2. Place your iron-on vinyl onto the standardgrip mat.


I use the brayer to help adhere my vinyl to the mat. Remember to place the iron-on vinyl shiny side down.


Recommended read: What is the Cricut brayer


   3. Size your branding logo down to less than 1/2" tall, mirror it and cut it out with your Cricut.


Recommended read: When to mirror and how


   4. Weed the design


   5. Cut the ribbon to 1" wide, fold it over onto itself, hamburger style, so that the width is now 1/2".


   6. Pre-heat the ribbon at medium heat for about 5 seconds. Place the iron-on vinyl, liner side up, onto the folded ribbon with the two raw edges on the left.


   7. Iron the vinyl onto the ribbon at medium temperature for about 30 seconds. Peel the liner up, flip the ribbon over and press for about 15 seconds.


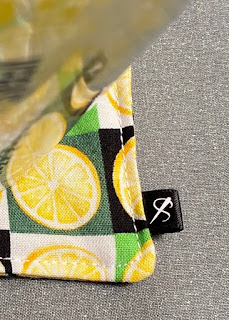
   8. Place the branding label into a gap or unsewn seam, so that when the sewing project is complete, the raw edges are hidden and your branding label is shown.


Tip: Keep the woven edges as the sides, fold over the ribbon and sew your seam with the raw edges hidden.


Recommended read: How to sew a Christmas stocking
Recommended read: How to sew scrunchies


Leave a comment below and let me know if you made some branding labels/tags! And don't forget to subscribe to stay up to date with all of Lizzsews new articles. See you next time!

Comments

Popular posts from this blog

10 Things You Need To Start Machine Embroidery Today

 This article is brought to you by  Lizzsews . How to start machine embroidery! Here’s everything that you need to get started with machine embroidery! Without spending too much! Are you interested in sewing? Recommended read:  10 things you'll need to start sewing! 1. You are going to need an embroidery machine . You can use any embroidery machine you want. Here are a couple of examples: The Brother se600. This machine can do both sewing and embroidery, and is the best budget embroidery machine! I highly suggest this machine. The brother pe550D! This is an embroidery-only machine, with awesome Disney embroidery designs! The brother se1900. I recommend the Brother brand for sewing and embroidery machines. To note here: determine your budget, determine how much you have to spend on embroidery supplies (and blanks ) and how much you have to spend on your machine. Purchase the largest embroidery hoop that you can afford! The se600 is an amazing machine and I highly recomm

8 Reasons Why Your Upper Thread Is Shredding On Your Embroidery Machine

 This article is brought to you by  Lizzsews . Here are some reasons why your top thread might be shredding while you’re embroidering! Starting machine embroidery is definitely a challenge, and troubleshooting is hard.  Recommended read: 10 Things you need to start machine embroidery today Often when your top thread is shredding, it’s caused by when the thread goes through the eye of the needle or while it’s going through the thread guides.  1. A dull or bent needle How long has it been since you’ve changed that needle? It might be time to swap it out! A needle only lasts about 8-10 hours of stitching, this amount of time may vary depending on what you are making. It’s good to have lots of needles on hand. Recommended read: When should I change the needle for machine embroidery 2. Are you using the right needle for the project? Are you embroidering heavier fabrics? Like denim or leather? If so, you’ll want to use a heavier needle size like 90/14. If you’re just embroidering mid-weight

Guide To The Three Main Machine Embroidery Stabilizers

 This article is brought to you by  Lizzsews . Here is everything that you need to know about the three main machine embroidery stabilizers. Stabilizers are important in machine embroidery; they prevent puckering and support the fabric.  The stabilizer goes underneath the fabric you are embroidering. Although there are some stabilizers that will go on top of certain types of fabric, this is called a topper.  A bottom stabilizer is always needed, you can never embroider without stabilizer, but a stabilizer topper is only needed for certain blanks. The three main types of stabilizers are cutaway, tearaway, and wash away.  The first is a cutaway stabilizer. A cutaway stabilizer can be used on clothes and many different types of fabric. The cutaway stabilizer is permanent and is mainly designed for knit fabric. It is non-woven and helps get rid of pulled or sagging stitches.  The cutaway stabilizer has a lot of stretch resistance and stays intact after wearing, using, and launderin