
How I made article 8

This article is brought to you by Lizzsews.


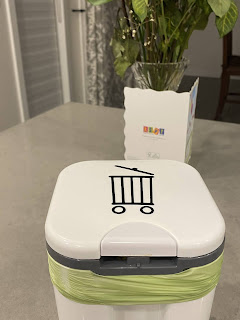
Today's article is just me using my creative brain around my house. I have this small compost bin that I use and I wanted to add something to the top of it; label everything challenge am I right?  I will guide you through how I added a trash bin design to my compost bin. Follow along with this project and share your result in Lizzsews Facebook group.


Recommended read: How I made article series


What I used:

  - Compost bin

  - Removable vinyl

  - Cricut

  - Transfer tape

  - Lysol wipe and paper towel

  - Standardgrip mat


Steps I took:


I started by cleaning off the top of the compost bin with a Lysol wipe and drying it with a paper towel. 


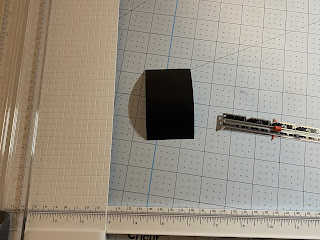
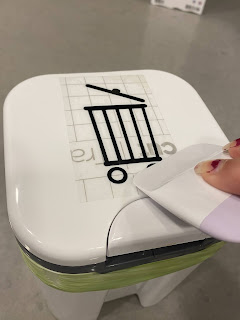
I cut out a trash bin design on the removable vinyl, which you can find on Cricut design space with this image ID: #M8944E3D. 


I weeded the design and cut out my transfer tape to size. I peeled the backing off of the transfer paper, held each side firmly and placed it on top of the vinyl. I burnished (polish by rubbing, smooth/scrape) the vinyl onto the transfer tape with the scraper tool. 


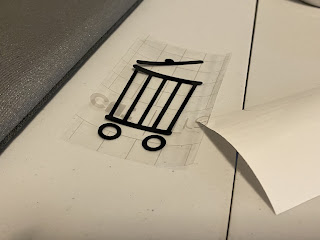
I then peeled the transfer tape up ensuring that all the vinyl was attached. 


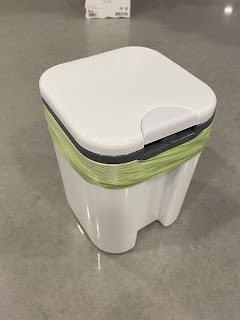
Next was placing the design onto the compost bin lid. I placed the transfer tape with the vinyl onto the lid in the spot that I wanted and burnished it. And I peeled up the transfer tape. 


Leave a comment below and let me know if you did this notebook cover design! Don't forget to subscribe to get notified for my next blog post :)

Comments

Popular posts from this blog

10 Things You Need To Start Machine Embroidery Today

 This article is brought to you by  Lizzsews . How to start machine embroidery! Here’s everything that you need to get started with machine embroidery! Without spending too much! Are you interested in sewing? Recommended read:  10 things you'll need to start sewing! 1. You are going to need an embroidery machine . You can use any embroidery machine you want. Here are a couple of examples: The Brother se600. This machine can do both sewing and embroidery, and is the best budget embroidery machine! I highly suggest this machine. The brother pe550D! This is an embroidery-only machine, with awesome Disney embroidery designs! The brother se1900. I recommend the Brother brand for sewing and embroidery machines. To note here: determine your budget, determine how much you have to spend on embroidery supplies (and blanks ) and how much you have to spend on your machine. Purchase the largest embroidery hoop that you can afford! The se600 is an amazing machine and I highly recomm

8 Reasons Why Your Upper Thread Is Shredding On Your Embroidery Machine

 This article is brought to you by  Lizzsews . Here are some reasons why your top thread might be shredding while you’re embroidering! Starting machine embroidery is definitely a challenge, and troubleshooting is hard.  Recommended read: 10 Things you need to start machine embroidery today Often when your top thread is shredding, it’s caused by when the thread goes through the eye of the needle or while it’s going through the thread guides.  1. A dull or bent needle How long has it been since you’ve changed that needle? It might be time to swap it out! A needle only lasts about 8-10 hours of stitching, this amount of time may vary depending on what you are making. It’s good to have lots of needles on hand. Recommended read: When should I change the needle for machine embroidery 2. Are you using the right needle for the project? Are you embroidering heavier fabrics? Like denim or leather? If so, you’ll want to use a heavier needle size like 90/14. If you’re just embroidering mid-weight

Guide To The Three Main Machine Embroidery Stabilizers

 This article is brought to you by  Lizzsews . Here is everything that you need to know about the three main machine embroidery stabilizers. Stabilizers are important in machine embroidery; they prevent puckering and support the fabric.  The stabilizer goes underneath the fabric you are embroidering. Although there are some stabilizers that will go on top of certain types of fabric, this is called a topper.  A bottom stabilizer is always needed, you can never embroider without stabilizer, but a stabilizer topper is only needed for certain blanks. The three main types of stabilizers are cutaway, tearaway, and wash away.  The first is a cutaway stabilizer. A cutaway stabilizer can be used on clothes and many different types of fabric. The cutaway stabilizer is permanent and is mainly designed for knit fabric. It is non-woven and helps get rid of pulled or sagging stitches.  The cutaway stabilizer has a lot of stretch resistance and stays intact after wearing, using, and launderin