
The famous 3D printing benchy

This article is brought to you by Lizzsews.


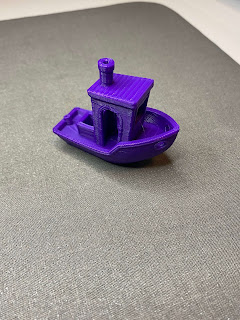
The benchy boat is a 3D print model that has been designed for testing and benchmarking your 3D printer. Use this print to test how your printer is printing and try out different slicing software settings and filaments.


Recommended read: What I use to slice my 3d print files
Recommended read: What is PLA


Benchy - short for benchmark!


You can find the Benchy here

The features of the benchy:

1. First layer details - On the bottom of the boat, there are shallow letters. These letters will reveal whether or not first-layer blobbing is occurring.

- If first layer blobbing is occurring, your nozzle is too close to the bed. If your print is not sticking to the bed, your nozzle might be too far from the bed. Relevel your printer bed.

Recommended read: How to level the 3d printer bed

2. Small and large horizontal holes - Can see if the printer has ringing or ghosting, vibration.

3. Low slope surfaces - Show the layered structure.

4. Overhang surfaces - Where the filament being extruded is hanging over the previous layer.

- If you have bad overhang angles, try reducing layer height, increasing fan cooling, reducing print speed, and reducing print temperature.

5. Cylindrical shapes - Show fluctuation in roundness, can show overheating.

6. Tiny surface details

7. Symmetrical - The benchy is symmetrical, crookedness and warping can be detected.

8. The hull - Reveals any surface fluctuation, like under or over extrusion, layer separation and/or wobble.

To print it:

- Keep the scale as a 1:1 ratio - this way when it's done printing you can measure it, it should measure 60mm from bow to stern

- Use a layer height of 0.2mm

- Set infill to 10% density

- Set print speed to 50 mm/s

- Set travel print speed up to 150 mm/s, I recommend 100mm/sec-120mm/sec

- The print nozzle diameter at 0.4 mm


Recommended read: What is slicing in the 3D printing files

To experiment with it:

This benchy is perfect for experimenting with different layer heights, infill densities, print speeds, travel speeds, retraction, nozzle diameter, and more.

But, print one benchy out first with the basic settings as stated above, make sure that this benchy prints out perfectly first, before changing any settings.

To experiment with your different settings, print out one benchy with the basic settings, this is your 'control group'. Next, change ONE setting, don't change more than one at a time. Compare your experiment with your control and look at the differences. If you want to change another setting, change that with the original, not with your experiment. See how that one prints and again compare it with your control. If both experiments printed well, you can now try to change the two settings, and see how it prints, again, compared to your control group.


Your benchy will print in about one hour


Recommended read: Mythosaurs (3D print)
Recommended read: About my 3D printer

Be sure to like and leave a comment to let me know if you printed the benchy! And don't forget to subscribe to get notified for our next blog post!

Comments

Popular posts from this blog

10 Things You Need To Start Machine Embroidery Today

 This article is brought to you by  Lizzsews . How to start machine embroidery! Here’s everything that you need to get started with machine embroidery! Without spending too much! Are you interested in sewing? Recommended read:  10 things you'll need to start sewing! 1. You are going to need an embroidery machine . You can use any embroidery machine you want. Here are a couple of examples: The Brother se600. This machine can do both sewing and embroidery, and is the best budget embroidery machine! I highly suggest this machine. The brother pe550D! This is an embroidery-only machine, with awesome Disney embroidery designs! The brother se1900. I recommend the Brother brand for sewing and embroidery machines. To note here: determine your budget, determine how much you have to spend on embroidery supplies (and blanks ) and how much you have to spend on your machine. Purchase the largest embroidery hoop that you can afford! The se600 is an amazing machine and I highly recomm

8 Reasons Why Your Upper Thread Is Shredding On Your Embroidery Machine

 This article is brought to you by  Lizzsews . Here are some reasons why your top thread might be shredding while you’re embroidering! Starting machine embroidery is definitely a challenge, and troubleshooting is hard.  Recommended read: 10 Things you need to start machine embroidery today Often when your top thread is shredding, it’s caused by when the thread goes through the eye of the needle or while it’s going through the thread guides.  1. A dull or bent needle How long has it been since you’ve changed that needle? It might be time to swap it out! A needle only lasts about 8-10 hours of stitching, this amount of time may vary depending on what you are making. It’s good to have lots of needles on hand. Recommended read: When should I change the needle for machine embroidery 2. Are you using the right needle for the project? Are you embroidering heavier fabrics? Like denim or leather? If so, you’ll want to use a heavier needle size like 90/14. If you’re just embroidering mid-weight

Guide To The Three Main Machine Embroidery Stabilizers

 This article is brought to you by  Lizzsews . Here is everything that you need to know about the three main machine embroidery stabilizers. Stabilizers are important in machine embroidery; they prevent puckering and support the fabric.  The stabilizer goes underneath the fabric you are embroidering. Although there are some stabilizers that will go on top of certain types of fabric, this is called a topper.  A bottom stabilizer is always needed, you can never embroider without stabilizer, but a stabilizer topper is only needed for certain blanks. The three main types of stabilizers are cutaway, tearaway, and wash away.  The first is a cutaway stabilizer. A cutaway stabilizer can be used on clothes and many different types of fabric. The cutaway stabilizer is permanent and is mainly designed for knit fabric. It is non-woven and helps get rid of pulled or sagging stitches.  The cutaway stabilizer has a lot of stretch resistance and stays intact after wearing, using, and launderin