
How To Sew Quick And Easy Coasters

  This article is brought to you by Lizzsews.


These coasters are easy to make, use a very minimal amount of fabric, look nice and finished (not sloppy and cheap!), are machine washable and reversible! 


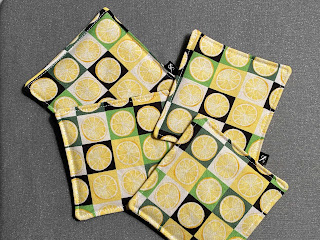
Here’s how to make a set of 4 coasters for your living room or dining room table (or anywhere else in the house), you can make more or less, it’s up to you. 


What you will need:

  • 100% cotton fabric, quilting cotton works best.
  • Rotary cutter and cutting mat
  • Batting
  • Pins
  • Iron + ironing board 
  • Sewing machine
  • Thread 
  • Sewing machine needle


The stepsto make 4 coasters:


   1. Cut 8 squares of 100% cotton fabric around 4.5” x 4.5”, this doesn’t have to be exact. Cut a square of batting the same size. 


You can make coasters that have the same pattern/solid colour on both sides or you can mix it up and do two different solids, solid and a pattern or even two different patterns. 


   2. Place two squares right sides together with the batting on top and pin all around them, repeat this step four times. Match up your squares with whatever patterns or solids you want together. 


   3. Sew around the square and leave a little gap around 1 inch so that you can flip it inside out afterwards. Do this with all four coasters. 


   4. Flip all of the coasters inside out. 


   5. Iron all of the coasters, poke out the corners and iron the raw edges of the gap inwards.


   6. Topstitch around the coaster, ensuring that you close the gap.


Recommended read: What is topstitching


Optional: add a branding label to your coaster by placing it in the gap before sewing it closed.

Recommended read: How to make branding labels


Optional: free motion quilt the coaster.


Leave a comment below and let me know if you made this coaster for Valentine's Day! And don't forget to subscribe to stay up to date with all of Lizzsews new articles. See you next time!

Comments

Popular posts from this blog

10 Things You Need To Start Machine Embroidery Today

 This article is brought to you by  Lizzsews . How to start machine embroidery! Here’s everything that you need to get started with machine embroidery! Without spending too much! Are you interested in sewing? Recommended read:  10 things you'll need to start sewing! 1. You are going to need an embroidery machine . You can use any embroidery machine you want. Here are a couple of examples: The Brother se600. This machine can do both sewing and embroidery, and is the best budget embroidery machine! I highly suggest this machine. The brother pe550D! This is an embroidery-only machine, with awesome Disney embroidery designs! The brother se1900. I recommend the Brother brand for sewing and embroidery machines. To note here: determine your budget, determine how much you have to spend on embroidery supplies (and blanks ) and how much you have to spend on your machine. Purchase the largest embroidery hoop that you can afford! The se600 is an amazing machine and I highly recomm

8 Reasons Why Your Upper Thread Is Shredding On Your Embroidery Machine

 This article is brought to you by  Lizzsews . Here are some reasons why your top thread might be shredding while you’re embroidering! Starting machine embroidery is definitely a challenge, and troubleshooting is hard.  Recommended read: 10 Things you need to start machine embroidery today Often when your top thread is shredding, it’s caused by when the thread goes through the eye of the needle or while it’s going through the thread guides.  1. A dull or bent needle How long has it been since you’ve changed that needle? It might be time to swap it out! A needle only lasts about 8-10 hours of stitching, this amount of time may vary depending on what you are making. It’s good to have lots of needles on hand. Recommended read: When should I change the needle for machine embroidery 2. Are you using the right needle for the project? Are you embroidering heavier fabrics? Like denim or leather? If so, you’ll want to use a heavier needle size like 90/14. If you’re just embroidering mid-weight

Guide To The Three Main Machine Embroidery Stabilizers

 This article is brought to you by  Lizzsews . Here is everything that you need to know about the three main machine embroidery stabilizers. Stabilizers are important in machine embroidery; they prevent puckering and support the fabric.  The stabilizer goes underneath the fabric you are embroidering. Although there are some stabilizers that will go on top of certain types of fabric, this is called a topper.  A bottom stabilizer is always needed, you can never embroider without stabilizer, but a stabilizer topper is only needed for certain blanks. The three main types of stabilizers are cutaway, tearaway, and wash away.  The first is a cutaway stabilizer. A cutaway stabilizer can be used on clothes and many different types of fabric. The cutaway stabilizer is permanent and is mainly designed for knit fabric. It is non-woven and helps get rid of pulled or sagging stitches.  The cutaway stabilizer has a lot of stretch resistance and stays intact after wearing, using, and launderin