This article is brought to you by Lizzsews.
In today's article, I will guide you through how 3D printed an AirPods case using flexible TPU filament. Follow along with this project and share your result in Lizzsews Facebook group.
What I used:
TPU filament
3D printer
AirPods
AirPods case 3D print file
Cura (slicing software)
Recommended read: About my 3D printer
Recommended read: What is slicing in the 3D printing world
The steps I took:
I started by researching 3D print files for AirPod cases. I found this wonderful print from Thingiverse, created by quentin01301. I sliced the file in Cura and adjusted the settings for my TPU filament. I used Eryone TPU filament and these were the settings that I used:
215 nozzle temp
60 bed temp
0.2mm height
30mm/sec speed
15% infill - grid fill
Supports yes
Retracting set as per Cura's TPU default
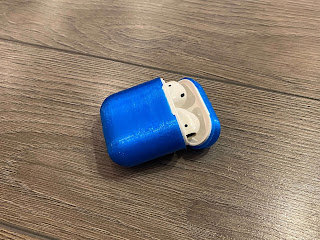
I printed it out and was very happy with the results, although removing the supports was the worst with flexible material.
It ended up great, I put the case on my AirPods but then was worried I would never be able to get it off lol. What I do is lift the cap on the case, face the AirPods upside down, hold both long sides of the case and push the bottom with my thumbs. This is easier to do also if you have 'squished' the case a bit before using it to make it a little more flexible.
A good thing to note here is that the charging of the AirPods doesn't work with the case on, but you can push the button.
UPDATE: I fixed the charging of the case by using an X-Acto knife and some small pieces of sandpaper!

Recommended read: Birthday Card: How I made article 9
Recommended read: Christmas Stockings: How I made article 11
Leave a comment below and let me know if you made this airpods case! And don't forget to subscribe to stay up to date with all of Lizzsews new articles. See you next time!
Comments
Post a Comment