
Christmas Deer Ceramic Coaster: How I made article 17

 This article is brought to you by Lizzsews. 


In today's article, I will guide you through how I made a Christmas deer coaster. Follow along with this project and share your result in Lizzsews Facebook group.


Recommended read: How I made article series


What I used:

Ceramic coaster

Infusible ink purple transfer sheets

Parchment paper

Cricut 

Standardgrip mat

EasyPress 2 + mat

Cardstock


The steps I took:

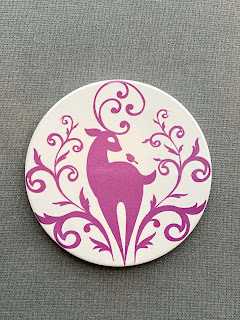
I started out by looking for the design that I wanted, I was looking for a Christmas design that would fit nicely on the coaster. I ended up choosing the Christmas ornate deer design from the hungry JPEG. I downloaded the SVG and uploaded it into design space.


I mirrored the design, sized it and placed the infusible ink onto my mat, inked side up. Once I cut out the design, I bent the transfer sheet to remove excess material. 

Recommended read: Cricut when to mirror (and how)


Infusible ink feels like cardstock, a thick paper. To remove the excess material and weed the design, you bend/roll the transfer sheet until the material cracks away.


I placed the weeded design, liner side up (inked side down), onto my ceramic coaster in the positioning that I wanted. Before placing the design, I ensured to wipe down the coaster with a lint-free cloth.


I preheated my easypress 2 to 400°F. I used the Cricut heat guide to determine the temperature and amount of time/pressure to press with. I placed a piece of cardstock on top of the easypress mat, placed the ceramic coaster design faced down/on the cardstock and a piece of parchment paper on top of everything. Next, I placed the easypress 2 onto everything and left it with no pressure for 240 seconds.


Once the timer was up, I slowly lifted up the easypress 2. I waited until the liner was cool to the touch to peel as it was very hot.


Leave a comment below and let me know if you made this coaster! Don't forget to subscribe to get notified for my next blog post :)

Comments

Popular posts from this blog

10 Things You Need To Start Machine Embroidery Today

This article is brought to you by Lizzsews Thinking about diving into machine embroidery but not sure where to start? Here’s everything you need to know to get started—without spending a fortune. Interested in sewing?  Recommended read: 10 Things You’ll Need to Start Sewing! 1. Get Yourself an Embroidery Machine You can start with any embroidery machine, but here are a few great beginner-friendly options: Brother SE600 – A combo machine that sews and embroiders. It’s affordable, versatile, and my top pick for beginners. Brother PE550D – Embroidery-only and comes with built-in Disney designs. Super cute! Brother SE1900 – A step up, with more advanced features and a larger embroidery area. 💡 Tip: Set a clear budget before buying, b uy the largest hoop your budget allows . While the SE600’s 4x4 hoop is great for starters, you may outgrow it quickly—and the next hoop size up is a big price jump. Recommended read: How to Choose the Right Embroidery Machine   ...

8 Reasons Why Your Upper Thread Is Shredding On Your Embroidery Machine

 This article is brought to you by  Lizzsews . Here are some reasons why your top thread might be shredding while you’re embroidering! Starting machine embroidery is definitely a challenge, and troubleshooting is hard.  Recommended read: 10 Things you need to start machine embroidery today Often when your top thread is shredding, it’s caused by when the thread goes through the eye of the needle or while it’s going through the thread guides.  1. A dull or bent needle How long has it been since you’ve changed that needle? It might be time to swap it out! A needle only lasts about 8-10 hours of stitching, this amount of time may vary depending on what you are making. It’s good to have lots of needles on hand. Recommended read: When should I change the needle for machine embroidery 2. Are you using the right needle for the project? Are you embroidering heavier fabrics? Like denim or leather? If so, you’ll want to use a heavier needle size like 90/14. If you’re just...

Guide To The Three Main Machine Embroidery Stabilizers

This article is brought to you by  Lizzsews . Here's everything you need to know about the three main types of machine embroidery stabilizers, what they're used for and how to pick the right one. 💡 Why Stabilizers Matter Stabilizers are essential in machine embroidery. They help support your fabric, prevent puckering , and ensure your design comes out clean and crisp. A stabilizer is placed underneath your fabric. Some special ones, called toppers , go on top, but these are only used for certain materials, like towels or blankets. 👉 You always need a bottom stabilizer. Toppers are optional and only used for specific projects. 🏷️ The 3 Main Types of Stabilizers 1. ✂️ Cutaway Stabilizer Cutaway stabilizer is non-woven , permanent, and ideal for stretchy or knit fabrics like t-shirts, baby onesies, and fleece. Why it's great: Provides strong support Prevents pulled or sagging stitches Stays put even after washing and wearing Comes pre-cut or in ro...