
How to sew a pencil case / zipper pouch

This article is brought to you by Lizzsews.


Pencil cases or zipper pouches are perfect for so many different uses. They can store anything and everything! I love sewing these pencil cases and storing my crafting supplies in them.


Recommended read: How to sew snack bags

What you'll need:

- Plastic zipper

- Cotton fabric

- Sewing machine

- Pins

- Iron + Ironing board

- Rotary cutter + cutting board (or scissors)

How-to:

1. Cut 4 pieces of 7" x 6" fabric, two for the lining and two for the outer.

2. Place the liner fabric right side up, the zipper right side up on top at the top of the fabric (The top stop (the two devices at the top end of the zipper to prevent the slider from coming off the zipper) should be on the right), and the outer fabric right side down on top of everything.

3. Attach the zipper foot and sew along the top, you should be sewing all three layers.

4. Place the other piece of liner fabric right side up and place the unsewn edge of the zipper along the top. Place the outer fabric right side down on top of the zipper and sew along the edge with the zipper foot.


5. Iron the edges of the zipper.

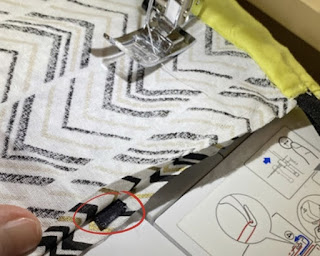
6. Topstitch each side of the zipper.

Recommended read: What is topstitching

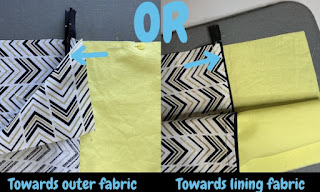
7. Unzip the zipper to just over halfway, match up the right sides of the outer fabrics and the right sides of the liner fabrics. You can push the zipper towards the lining or towards the outer fabric, I prefer it pushed towards the lining fabric.


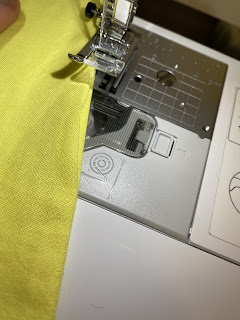
8. Sew around the perimeter of everything, leave a gap on the bottom edge of the lining. I like to backstitch over the zipper too.

Optional: While sewing around the outer fabrics, add a branding label on the side of where the zipper pull is, face down. Make sure that you sew the label so that you can see the raw edges and the actual branding tag is on the inside, that way it works when you flip it inside out!


Recommended read: How to make branding labels/tags

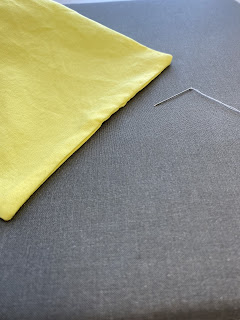
9. Flip the bag inside out. Poke out the corners using a crochet hook, bamboo stick, scissors (be careful!), or whatever works for you, by going through the hole in the lining. Before pushing the lining into the outer fabric, iron it flat and topstitch the opening closed. You could also hand sew a hidden stitch here.


Recommended read: How to hand sew a hidden stitch


Leave a comment below and let me know if you made this pencil case! And don't forget to subscribe to stay up to date with all of Lizzsews new articles. See you next time!

Comments

Popular posts from this blog

10 Things You Need To Start Machine Embroidery Today

 This article is brought to you by  Lizzsews . How to start machine embroidery! Here’s everything that you need to get started with machine embroidery! Without spending too much! Are you interested in sewing? Recommended read:  10 things you'll need to start sewing! 1. You are going to need an embroidery machine . You can use any embroidery machine you want. Here are a couple of examples: The Brother se600. This machine can do both sewing and embroidery, and is the best budget embroidery machine! I highly suggest this machine. The brother pe550D! This is an embroidery-only machine, with awesome Disney embroidery designs! The brother se1900. I recommend the Brother brand for sewing and embroidery machines. To note here: determine your budget, determine how much you have to spend on embroidery supplies (and blanks ) and how much you have to spend on your machine. Purchase the largest embroidery hoop that you can afford! The se600 is an amazing machine and I highly recomm

8 Reasons Why Your Upper Thread Is Shredding On Your Embroidery Machine

 This article is brought to you by  Lizzsews . Here are some reasons why your top thread might be shredding while you’re embroidering! Starting machine embroidery is definitely a challenge, and troubleshooting is hard.  Recommended read: 10 Things you need to start machine embroidery today Often when your top thread is shredding, it’s caused by when the thread goes through the eye of the needle or while it’s going through the thread guides.  1. A dull or bent needle How long has it been since you’ve changed that needle? It might be time to swap it out! A needle only lasts about 8-10 hours of stitching, this amount of time may vary depending on what you are making. It’s good to have lots of needles on hand. Recommended read: When should I change the needle for machine embroidery 2. Are you using the right needle for the project? Are you embroidering heavier fabrics? Like denim or leather? If so, you’ll want to use a heavier needle size like 90/14. If you’re just embroidering mid-weight

Guide To The Three Main Machine Embroidery Stabilizers

 This article is brought to you by  Lizzsews . Here is everything that you need to know about the three main machine embroidery stabilizers. Stabilizers are important in machine embroidery; they prevent puckering and support the fabric.  The stabilizer goes underneath the fabric you are embroidering. Although there are some stabilizers that will go on top of certain types of fabric, this is called a topper.  A bottom stabilizer is always needed, you can never embroider without stabilizer, but a stabilizer topper is only needed for certain blanks. The three main types of stabilizers are cutaway, tearaway, and wash away.  The first is a cutaway stabilizer. A cutaway stabilizer can be used on clothes and many different types of fabric. The cutaway stabilizer is permanent and is mainly designed for knit fabric. It is non-woven and helps get rid of pulled or sagging stitches.  The cutaway stabilizer has a lot of stretch resistance and stays intact after wearing, using, and launderin