
How I made 3D print of robot holding a heart for valentine's day

This article is brought to you by Lizzsews.


I had to 3D print something for valentine's day, cue the adorable robot holding a heart. I was scrolling through Cults3d and found this 3d model by PLP.


Recommended read: The famous 3D printing benchy
Recommended read: How I made article series

What I used:

Purple PLA filament

3D printer

Robot holding a heart by PLP STL

Cura (slicing software)


Recommended read: What is PLA
Recommended read: What is slicing
Recommended read: About my 3D printer

How I made it:

To create this 3D print, I started off by downloading the 3d print model by PLP on cults3d. I opened the robot file up in Cura and added the heart to the same board. I set my printing settings:

0.2mm resolution

10% infill -zig zag

200/60 temp for PLA

50mm/sec speed

Supports at 60° overhang angle -triangles 15% density

5-line skirt

Result:

Under 20-minute print, under 1" tall.

After that print, I sized the design up 300%, I used the same settings and had about a 3-hour print, about 2 1/2" tall.


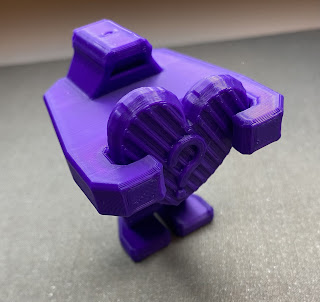
The print turned out beautifully, I love both the tiny and the large robot! This is perfect for Valentine's Day.


Leave a comment below and let me know if you printed this robot! And don't forget to subscribe to stay up to date with all of my new articles. See you next time!

Comments

Popular posts from this blog

10 Things You Need To Start Machine Embroidery Today

 This article is brought to you by  Lizzsews . How to start machine embroidery! Here’s everything that you need to get started with machine embroidery! Without spending too much! Are you interested in sewing? Recommended read:  10 things you'll need to start sewing! 1. You are going to need an embroidery machine . You can use any embroidery machine you want. Here are a couple of examples: The Brother se600. This machine can do both sewing and embroidery, and is the best budget embroidery machine! I highly suggest this machine. The brother pe550D! This is an embroidery-only machine, with awesome Disney embroidery designs! The brother se1900. I recommend the Brother brand for sewing and embroidery machines. To note here: determine your budget, determine how much you have to spend on embroidery supplies (and blanks ) and how much you have to spend on your machine. Purchase the largest embroidery hoop that you can afford! The se600 is an amazing machine and I highly recomm

8 Reasons Why Your Upper Thread Is Shredding On Your Embroidery Machine

 This article is brought to you by  Lizzsews . Here are some reasons why your top thread might be shredding while you’re embroidering! Starting machine embroidery is definitely a challenge, and troubleshooting is hard.  Recommended read: 10 Things you need to start machine embroidery today Often when your top thread is shredding, it’s caused by when the thread goes through the eye of the needle or while it’s going through the thread guides.  1. A dull or bent needle How long has it been since you’ve changed that needle? It might be time to swap it out! A needle only lasts about 8-10 hours of stitching, this amount of time may vary depending on what you are making. It’s good to have lots of needles on hand. Recommended read: When should I change the needle for machine embroidery 2. Are you using the right needle for the project? Are you embroidering heavier fabrics? Like denim or leather? If so, you’ll want to use a heavier needle size like 90/14. If you’re just embroidering mid-weight

Guide To The Three Main Machine Embroidery Stabilizers

 This article is brought to you by  Lizzsews . Here is everything that you need to know about the three main machine embroidery stabilizers. Stabilizers are important in machine embroidery; they prevent puckering and support the fabric.  The stabilizer goes underneath the fabric you are embroidering. Although there are some stabilizers that will go on top of certain types of fabric, this is called a topper.  A bottom stabilizer is always needed, you can never embroider without stabilizer, but a stabilizer topper is only needed for certain blanks. The three main types of stabilizers are cutaway, tearaway, and wash away.  The first is a cutaway stabilizer. A cutaway stabilizer can be used on clothes and many different types of fabric. The cutaway stabilizer is permanent and is mainly designed for knit fabric. It is non-woven and helps get rid of pulled or sagging stitches.  The cutaway stabilizer has a lot of stretch resistance and stays intact after wearing, using, and launderin